

Tutorial – Working with Text & PDF’s
The following are a set of general guidelines that should help as you type up the descriptive paragraphs and abstracts that will be needed on each of the various pages of your collection.
1) “Top Level” / “Numbered” PAGES:
Study the left margin, “Content Areas“, list that appears on every Library page. Notice that some of the items are numbered (1 – 7). These are our Primary Topic Groups. If you click on one of these numbered links you will see that the resulting page displays the Primary Topic Title and number at the top. This page may or may not display the name of the assigned Curator. Here is an example of one such Top Level page (may still be under construction).
The page will also display a small a “signature photo” that would be accepted by most knowledgeable visitors as being a fair visual representative of this topic area. The small photo may or may not be linked to a larger version of the photo (see also our “Working With Photos” tutorial). The curator should try to include a footnoted, smaller font-sized, description of the nature and significance of the photo at the bottom of the page.
Next to, or below, the photo the reader should discover a descriptive paragraph (or two) providing the “big picture” for this general topic topic area. This description should be written by the curator with input from peers active in this general topic area.
Below the topic description the visitor should see a set of text links that will jump to the various sub-divisions of this main topic area. They should be the same links and in the same order as you see in the main “Content Areas” list in the left margin. Each of these one-line links should also have an associated one or two-line description of the nature of this sub-division topic area. When clicked, these links will take the reader to a new “2nd Level” / “Daughter Level” page.
2) “2nd Level” / “Daughter Level” PAGES:
The format for your “2nd Level” / “Daughter Level” pages should be similar to that of a “Top Level” page. The sub-division area TITLE will be at the top with the CURATOR named and credentialed below it. Once again the page should have some sort of small “Signature Photo” (linked or not) that graphically sets the tone for a visitor to this “2nd Level” topic area. Photo footnotes (small font) at the bottom of the page are again to be encouraged. Just as was done on the Top Level / Primary Topic page the curator will need to compose a one or two paragraph description for this new field of study.
Below the descriptive text will begin the list of links, and associated one or two-line descriptions, that will lead the visitor to the “3rd Level” / “Catalog Level” POSTs. Note: there will be no more PAGES from this point on (please read our “Creating A Post” tutorial if you can’t recall the difference between a PAGE and a POST).
3) “3rd Level” / “Catalog Level” POSTS:
Even though we are now publishing POST pages instead of regular PAGES, each “3rd Level” POST page will still need to maintain the same “look and feel” of the preceding PAGES… Title, Curator Byline, Signature Photo, etc. However from now on The “3rd Level” will be where we will begin to post links to allow the visitor to download the actual PDF documents, maps and photos. Similar to the links on our previous pages the links on these POST pages will still need to have their own one or two-line descriptions / abstracts. Think of them as the final “teaser” to entice the visitor to click the link and download the file. So be creative and as descriptive as possible without going over our two line limit.
Note: Depending upon how extensive and/or broad ranging the various “3rd Level” sub-topic areas may be, it may even be necessary to drop down to a “4th Level” POST. If that becomes necessary the “3rd Level” POST pages will not contain links to the actual FILES. Instead the “3rd Level” POST will provide still one more degree of sub-topic granularity, and it will be the “4th Level” POSTs that will contain the download links to the actual FILES. Do your best to avoid confusing the visitor if you must use “4th Level” POSTs.
4) File Formats:
What type of files can we upload? All non-photographic documents must be submitted in PDF format. These documents may include embedded photos, graphs and diagrams, etc., even audio files, but the final saved file must be in the PDF format. That means even stand alone Spreadsheets, Graphs, Datatables and PowerPoint presentations must also be converted to PDF format. Please DON’T post any business tool files in their native file format: no “DOC“, “XLS“, “PPT“, etc. files or their newer equivalents. Most business suite software today offer the ability to export their native files in PDF format, ex: DOC-to-PDF (MS Word) or a WPD-to-PDF (WordPerfect), etc. Even a PowerPoint presentation file can be converted to PDF. Consult the documentation that came with your software. Most full-featured scanners now include an automatic PDF output option that will even group all pages into a single file. NOTE: Before you upload your PDF file sure to refer to section #8 (below) to make sure that your PDF file has been converted to a “searchable” format. Be sure to consult the directions for the specific PDF generation software installed on your computer (Ex: Adobe Acrobat).
5) Naming Files:
Make sure to name your PDF file using the following basic naming protocol:
year_author-name_subject_content-area-#_2nd-level-name.pdf
Example: (colors are not required)
“2010_proctor_global-warming_5_environmental-geology.pdf“.
This example links to an actual file. Click link to see an example of nice PDF article.
6) Importing Text From A Word Processor:
It is possible to freely move text between your word processor and our Word Press editor. If you have not yet done so, go up now and click the odd button that sits to the left of the blue question mark button up on the button bar. The “tool tip” for that button should say “Show/Hide Kitchen Sink“. A second row of buttons should now be visible. You will notice that, on the lower button bar, there is a button that will let you paste text from MS Word or paste text as pure text, without formatting. Just select / copy your desired text in your word processor and then click this button and paste your text into the window that opens. When you click the “Insert” button your text will be added to your web page.
That sounds simple, however I should warn you that it tends to be best to paste text as pure, unformatted, text because of the amount of hidden code that MS Word puts into its text. You won’t be able to see that extra code but when you paste your word processor text into an HTML page (a web page) all the extra code sometimes makes the page very large and very slow loading… and sometimes it does things you hadn’t intended in certain browsers. We recommend that you use OUR editor to add your formatting… bold, underline, colors, font sizes, etc. where possible. Not a rule… just encouraged.
7) Search Terms Section:
To maintain an uncluttered look for your page hit the “Enter” key TWICE to add a few blank lines below the link line to your file. Move your cursor to the lowest blank line and make a new, underlined and bolded, HEADING… call it “Search Terms“. Hit the “Enter” key one more time to start a new line below your new heading.
Being the expert in this particular topic area and having already read this document you should now be able to come up with perhaps a dozen or more terms that you feel would be the ones most likely to be used by a library visitor trying to find this document. Type these terms onto this line… add a space between each term.
The following search terms MUST be included in this section:
(“blue items below. Quotes not needed)
– The full name of the author. ex: “Allen W. Hatheway”
– The year the article was originally published or written. ex: “1988”
– The full name of the article. ex: ”Characterization in the Overall Design Process”
– The Content Area this article will be filed under. ex: “5 Technical”
– The 2nd Level this article will be filed under. ex: “– Site Characterization”
– The 3rd Level (if any) this article will be filed under. ex: “Historical Precedence“
Note: any term that you have already included in the description (abstract) on this page will NOT have to be retyped into the “Search Terms” section.
8) Make Your PDF Files Searchable:
Please understand that a PDF file, in its simplest form, is pretty much nothing more than a photograph… just a lot of dots… no actual typed characters. Search engines can’t search dots… only characters. Acrobat and other PDF software programs can fix that by using the “OCR” tool. The term “OCR” stands for “Optical Character Recognition“. This tool will move down your document and turn all of the dots back into characters. It will then resave your PDF file, using the original name, with a special new, transparent, top layer that stores the characters it found. Later, when a search engine looks at the file it will be able to ”see” the characters it needs and can find the term you were looking for!
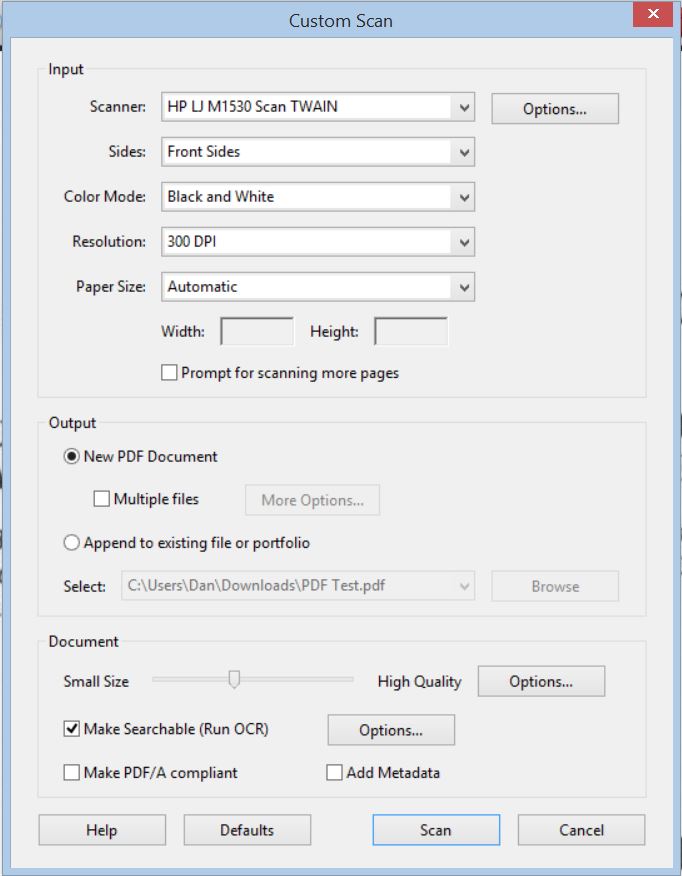
If you are starting with a paper document (hard copy) and a scanner you will need to place your document on the scanner and then start your PDF software. If you are using Acrobat you would then click on the “Document” menu item and then the “Scan To PDF” item. You will then be provided with a list of possible document types… like “Black & White”, “Gray-scale”, “Color”, etc. I recommend that you skip all those options and jump down to “Custom Scan” (see example below) where you will find all the other options plus a few new ones… like the ability to combine multiple pages into a single file and the one you REALLY want… “Make Searchable (Run OCR)“. When you think you have it all set up just hit the “Scan” button at the bottom and the magic will happen! Just don’t forget to follow the correct file naming convention when saving your final product!
“But I already HAVE a PDF file and I can’t search it or select words!“ Here’s what you will need to do to each of your previously scanned PDF documents if they do not appear to be searchable (you are unable to select individual words or lines) or you are just not sure… Open the PDF file in your Acrobat software. Click on the “Document” menu item and then on the “OCR Text Recognition” option and then the “Recognize Text Using OCR…“. Yes, I know it’s redundant… just click on it anyway!
Note: if your previously scanned PDF document appears to have become tilted during the scanning process you may find that you get better search results if you do one extra step BEFORE you run the OCR process described above. That step would be item number two under the “Document” menu item… “Optimze Scanned PDF“. This step will straighten your document (deskew) and will produce a document where using your mouse or cursor keys to select words and lines will appear to be more accurate. Remember, a searchable PDF actually consists of two layers… an image layer and a transparent word layer above that image. For an optimal viewer experience we want those two layers to line up properly.
Finally go ahead and upload the named file to the Media Library and create a link to it from your catalog abstract page.
Note: MS Word is able to convert it’s own, native DOC or DOCX files to the searchable PDF format we describe above but unfortunately does not appear to be able to OPEN a previously created PDF file… this limitation may change with future versions of Word.
Note: 8 1/2 x 14 (Legal) and 17 x 11 (Tabloid) sized documents are also welcome although may prove difficult to convert to the PDF format without a large-format scanner or the use of a document camera.
Contact the Webmaster for suggestions.
9) Stumped? More questions about documents for your collection?
1st – Post your question in the Comments area at the bottom of this page. When a curator posts a comment about a tricky problem he/she is having we encourage others who may have discovered the solution to please be willing to post a REPLY. You may be a newbie but you might also be the only one who has ever discovered a solution to this problem… speak up… you’re safe here… these “Curator Corner” pages are NOT visible to the Public… only to your very sympathetic fellow curators. Please resist the temptation to simply send an email to the person with the problem… when you post your offer of help here EVERYONE learns as others join in and also offer suggestions.
2nd – The Editor-In-Chief and Webmaster will always attempt to monitor these forum pages and offer suggestions in a timely manner. If your question is languishing, unanswered, please send a “Question Waiting – Editor-In-Chief“ or “Question Waiting – Webmaster” email and we will attempt to take a look ASAP.
Please join in this conversation. Use the “Comments” section below…